Fingerpicking on the Ukulele | A Beginner’s Guide
The ukulele is a beautiful and approachable instrument, beloved by musicians of all levels. Thanks to its bright, cheerful tone and compact, travel-friendly size, it’s an ideal choice for both beginners and experienced players. Beyond its simplicity lies a surprising depth—one of the most captivating aspects of the ukulele is its ability to produce rich, expressive sounds. Fingerpicking on the ukulele is one such technique that unlocks this expressive potential, adding texture, emotion, and nuance to your playing.
Among the techniques that reveal this expressive potential, fingerpicking stands out. Unlike basic strumming, fingerpicking allows you to add texture, emotion, and complexity to your music. It brings a new layer of nuance, enabling you to create melodies and rhythms simultaneously.
Whether you’re just starting out or looking to take your ukulele skills to the next level, learning fingerpicking can be a game-changer. In this comprehensive guide, we’ll walk you through the essentials—from basic technique and common patterns to helpful practice tips. By the end, you’ll be ready to weave fingerpicking seamlessly into your playing, bringing your ukulele performances to life with greater depth and expression.

What is Fingerpicking on the Ukulele?
Fingerpicking is a technique where you pluck the strings of the ukulele using your fingers instead of a pick or plectrum. What makes fingerpicking truly special is its ability to produce multiple tones simultaneously, resulting in a fuller, richer sound compared to traditional strumming. This technique not only enhances the musical texture but also adds emotional depth and subtlety to any piece, making it an essential skill for ukulele players aiming for expressive and dynamic performances.
To understand how fingerpicking works, it’s helpful to know the role each finger plays. Typically, the thumb takes charge of the lower strings—the G and C strings—while the index, middle, and occasionally the ring finger are responsible for the higher strings, namely the E and A. This division of labor between the fingers is what gives fingerpicking its layered, intricate sound. However, mastering this coordination is both the challenge and the reward. It requires practice and precision, as each finger must operate independently to pluck strings either simultaneously or in a flowing sequence.

Basic Fingerpicking Technique
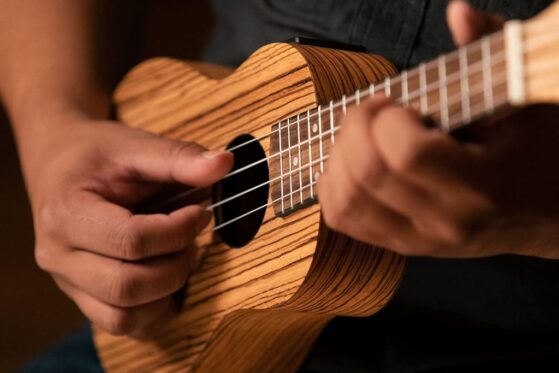
Before diving into specific patterns, it’s essential to first build a solid foundation for your fingerpicking technique. Developing the right form and habits early on will make learning patterns much smoother. Here’s how to get started:
1. Hand Position
To begin, your hand should be relaxed, with your fingers gently hovering just above the strings. Next, aim to hold your hand at a comfortable angle—not too high or too low—ensuring ease of movement. Additionally, keep the palm of your hand slightly away from the ukulele’s body to maintain freedom and fluidity. Finally, let your thumb rest lightly on the back of the neck, providing both support for the instrument and flexibility for your fingers as they move.
2. Fingers Used
The thumb typically takes charge of the top two strings—usually the G and C strings—laying the rhythmic foundation. Moving on, the index finger is generally used to pluck the E string, while the middle finger follows by handling the A string. For added depth or more intricate patterns, some players also bring in the ring finger to pluck specific strings as needed.
3. Finger Motion
The motion of your fingers should be smooth and controlled, ideally using the pads—rather than the tips—to strike the strings. Instead of moving from the wrist, the action should originate from your knuckles, allowing for better precision. To support this motion, it’s important to keep your wrist relaxed and flexible, ensuring a natural and comfortable playing experience.
4. Plucking the Strings
When plucking the strings, aim for a soft, gentle touch that allows each string to vibrate naturally and resonate clearly. Instead of striking or “slapping” the string—which can produce a harsh, unpleasant tone—focus on controlled, smooth movements. The goal is to produce a clean, crisp note with every pluck, adding clarity and musicality to your playing.
5. Relaxation
Fingerpicking can sometimes place strain on the fingers and wrist, particularly when you’re just starting out. That’s why it’s crucial to stay mindful of your hand position and maintain a relaxed grip throughout the process. If tension builds up, it can not only hinder your progress but also make the technique feel more difficult than it needs to be. Staying loose and comfortable allows your fingers to move more freely, helping you build fluidity and control over time.

Common Fingerpicking Patterns
Once you’ve gotten comfortable with the basic technique, it’s time to learn some fingerpicking patterns. Here are a few to get you started:
1. Basic Thumb-Index-Middle (TIM) Pattern
One of the simplest fingerpicking patterns, the TIM pattern is an excellent way to build coordination between your thumb and fingers. It works like this:
Thumb (T): Pluck the G string.
Index (I): Pluck the C string.
Middle (M): Pluck the E string.
Repeat the pattern.
This pattern can be used on any chord, and it’s a good starting point to help develop your muscle memory and coordination.
2. Travis Picking
Travis picking is a signature style of fingerpicking that adds more complexity and rhythm to your playing. This pattern uses alternating bass notes with the thumb while the fingers work on the higher strings. The basic pattern looks like this:
Thumb (T): Pluck the G string.
Index (I): Pluck the E string.
Thumb (T): Pluck the C string.
Middle (M): Pluck the A string.
Repeat the pattern.
The Travis picking pattern is often used in folk and country music, but it can work for any genre. It provides a steady rhythmic pulse with a flowing melody above.
3. The PIMA Pattern
The PIMA pattern is one of the more intricate fingerpicking patterns that incorporates all four fingers:
P: Thumb (G string)
I: Index (C string)
M: Middle (E string)
A: Ring (A string)
This pattern is commonly used in classical music and allows for greater expressiveness. The PIMA pattern is ideal when you want to have a more complex, intricate sound.
4. Pinch Pattern
A pinch is a quick pluck of two strings at once. In fingerpicking, the thumb and a finger will simultaneously pluck two strings, creating a “pinch” sound. This technique is often used in combination with other patterns, especially in folk and bluegrass music. For example:
Thumb (T): Pluck the G string and A string simultaneously.
Index (I): Pluck the C string.
Repeat the pattern.
This creates a dynamic, punchy rhythm that is fun to play.

How to Practice Fingerpicking on the Ukulele
Mastering fingerpicking on the ukulele takes time and patience. Like any new skill, it requires consistent effort and dedication. To help you progress smoothly and build confidence along the way, here are some practical tips for effectively practicing fingerpicking:
1. Start Slow
When you’re just starting to learn a fingerpicking pattern, it’s essential to begin by slowing down the tempo. This deliberate pace gives you the space to concentrate on the accuracy of each finger’s motion and helps build a strong foundation. As you continue to practice and your coordination becomes smoother, speed will follow naturally. Therefore, rather than hurrying, focus on developing control and consistency first—rushing too soon can lead to sloppy technique and frustration down the line.
2. Use Simple Chords
Start practicing with basic chords such as C, G, F, and Am. These are foundational chords that you will use in many songs. The goal is to get comfortable with the mechanics of fingerpicking while maintaining clean, clear notes from the chords.
3. Focus on Timing
Fingerpicking patterns rely on good timing, so it’s important to be aware of the rhythm you’re playing. Use a metronome or play along with backing tracks to keep a steady tempo.
4. Break Down Patterns
If you’re struggling with a specific pattern, try breaking it down into smaller, manageable segments. Start by focusing on the thumb motion first, then gradually add the index, followed by the middle finger, and continue this step-by-step approach. This way, you can build up the pattern slowly and ensure each part is mastered before moving on to the next.
5. Take Breaks
Remember to give your hand and wrist time to relax throughout your practice. Overworking your fingers can lead to strain, so it’s essential to practice in shorter sessions. Make sure to take breaks regularly, allowing your muscles to rest and recover before continuing.

Applying Fingerpicking to Songs
Once you’re comfortable with the basic fingerpicking patterns, the next exciting step is applying them to actual songs. This not only reinforces your technique but also brings a sense of musicality to your practice. Fingerpicking isn’t just a technical skill—it’s a way to breathe life into a melody. Many classic and modern songs feature fingerpicking as a core element, making them perfect for beginners to explore and enjoy.
To help you ease into this process, here are a few beginner-friendly songs that incorporate fingerpicking in a simple and effective way:
-
“Riptide” by Vance Joy – This upbeat indie hit uses a repetitive and accessible fingerpicking pattern, making it a great first song to try.
-
“Somewhere Over the Rainbow” – Known for its dreamy and emotive melody, this timeless tune sounds especially magical with gentle fingerpicking.
-
“Let It Be” by The Beatles – A soulful classic that pairs beautifully with basic fingerpicking, helping you focus on both rhythm and feel.
Creating Your Own Fingerpicking Patterns
Once you’ve gained confidence playing these songs, you’ll likely start to feel more adventurous. This is a great moment to begin creating your own fingerpicking patterns. As your fingers become more coordinated and your ear more refined, you’ll notice that you can start to improvise with rhythm, dynamics, and note combinations.
The ukulele, with its warm and versatile tone, is ideal for experimentation. Try blending the patterns you’ve already learned, switching up which strings you pluck, or adding syncopation to create a new groove. As you experiment, you’ll discover how fingerpicking can transform even the simplest chord progression into something rich and expressive.
In time, this creative freedom will help you develop a personal fingerpicking style—one that reflects your musical taste and expressive voice on the instrument.

Conclusion
Fingerpicking on the ukulele is a rewarding and expressive technique that adds depth, nuance, and emotion to your playing. It opens up a new dimension of sound, allowing you to explore the full range of the instrument beyond basic strumming. As you begin to master simple fingerpicking patterns and stay consistent in your practice, you’ll notice a remarkable improvement—not just in your technique, but in your overall musical expression.
Whether you’re dreaming of playing intricate classical arrangements or adding a delicate touch to your favorite folk songs, fingerpicking is a versatile skill that can transform your ukulele journey. The beauty of this technique lies in its ability to bring out both melody and rhythm at once, creating a richer and more dynamic sound.
At The Mystic Keys, we’re here to help you take that journey further. Our experienced instructors guide you step by step, helping you build confidence and creativity in your playing. So if you’re ready to grow as a musician, join The Mystic Keys and unlock the full potential of fingerpicking on the ukulele.
With dedication, the right guidance, and a bit of patience, you’ll soon be crafting beautiful, fingerpicked melodies that inspire both you and your listeners. Happy playing!
Related Blogs
How to Learn Ukulele Step by Step | A Comprehensive Guide
The ukulele is a delightful and accessible instrument that has become increasingly popular due to its cheerful sound, portability, and simplicity. Whether you’re picking up the ukulele for the first time or looking to refine your skills, taking the time to learn ukulele step by step will help you build a strong foundation.
Ukulele Sizes | Soprano, Concert, Tenor
& Baritone
The ukulele is a fascinating instrument with a bright, cheerful tone that has captivated musicians for generations. Originally from Hawaii, it has grown into a global favorite across various musical genres, from pop and folk to jazz and classical.
How Long Does It Take to Learn
the Ukulele?
The ukulele is often considered one of the most beginner-friendly instruments, yet it also offers incredible depth for advanced players. Its light, breezy tone and easy portability make it a popular choice for musicians of all levels.